
Alloy Guards and Exhaust System
We’re well on our way to seeing a completed tractor unit. This month, we finish the final assembly of the chassis components.
Now that we have had the local tyre man around to outfit us with a fresh set of painted rims and new rubber, we are ready to fit some alloy guards and complete the plumbing and fitment of the exhaust system.
Once again, select the required parts first and lay them out in sequence, taking care to label any elements that might look like each other to avoid getting them confused or mixed up once you start assembly.
I found the best way forward was not fitting the guards at this stage, and instead, jumping ahead from step 6 to step 7 made more sense. The reason for this was you need to flip the chassis over and work on the underside as you install the exhaust components, and the mounting arms and brackets for the guards are rather delicate and could break.
Looking at step 7, the process is to work through the parts numerically. The various items for this stage are numbered from 115 through to 122, and this sequence is the way forward for fixing the parts to the chassis. You will find that parts 120 and 121 that form the main exhaust canister tend to want to move about while the glue is trying to set, so a small strip of masking tape applied lightly to the surfaces will help keep things secure until the glue goes off.
Once the entire exhaust system is in place and the glue has dried completely, you can apply a coat of paint. Use the same flat brown colour used for the manifolds and turbochargers on the engine block, but this time, do not paint a solid coat. Rather, use less paint on the brush and work it onto the exhaust surfaces in a speckled fashion to achieve a thin and mottled coat, giving the exhaust and associated plumbing a more realistic worn look.
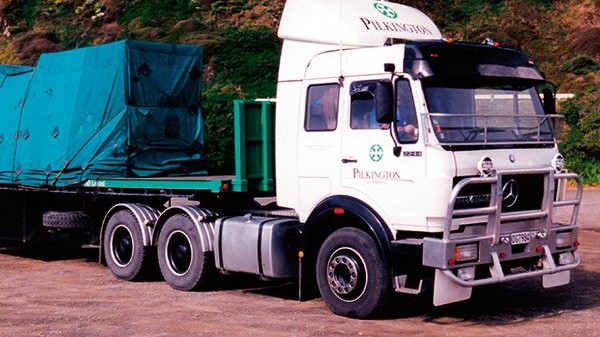
 Our subject matter, Pilkington Automotive Glass Mercedes-Benz 2244, driven by Ken Kirk in 1992.
With the exhaust system locked in place, we can flip the chassis back onto its wheels and now look back at the final stages of step 6, the assembly and fitment of the guards over the rear drivers. All four guards are the same. However, you will see both front and rear mounting arm brackets – parts 105 and 107 – so again, take time to identify the individual parts correctly.
Once all four guards are assembled, apply a coat of paint if needed. For our Ken Kirk/Pilkington Glass project, I used a flat silver to represent the aluminium guards that were fitted to the real truck. Painting these is entirely optional as they could be left black, as this will give the appearance of Rhino-style plastic guards or similar.
Fitting the guards is a little fiddly, and patience is required. Ensure the paint on any glue-contact surfaces is removed correctly to ensure good solid adhesion. The bracket arms are very thin, and there is not much contact area, so it is important to make it count where you do have glue contact.
Complete one side at a time; once happy with the position of the guards, leave the glue to solidly dry before attempting to complete the opposite side. As I mentioned, this is where patience is required, slowly gets the results.
Once the glue holding the guards is completely dry, you can hang the rear tail-light assemblies as well as the number-plate holder.
With the last of the accessories fitted to the chassis, we can look at the interior assembly, moving towards the construction of the cab. So start your research and investigate truck interior colour schemes from the late 1980s and early 1990s.


From left: 1) Select the required parts and lay them out in sequence, ready for assembly, which will help prevent confusion once you start glueing. 2) A small strip of masking tape helps to keep the exhaust system in place while the glue sets. 3) Once the glue is dry, paint the exhaust system. Use minimal paint to allow the black to show through in mottled patches for a more realistic, weathered look.


4) Careful assembly of the guards is required, note the two different kinds of mounting bracket arms, one forward-facing, the other rearward-facing. 5) Painting the guards is optional; here they are painted a flat silver to look like aluminium, as on the real truck. 6) The completed chassis ready for its cab. Remember: have patience when fitting the guards, they are fiddly, and it is best to complete one side at a time.
Do you build model trucks? Would you like to share your stories and model builds with our readers? Please feel free to contact us by emailing carl@nztrucking.co.nz. We dedicate these pages to supporting the hobby, and we would love to hear from you.


