
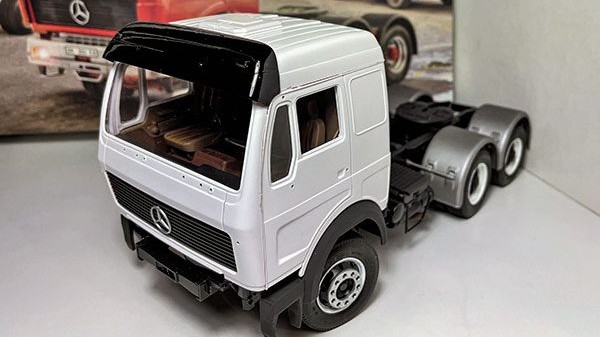
Our build continues this month with the Pilkington Glass Mercedes-Benz beginning to appear as we paint and construct the cab shell around the already preformed interior.
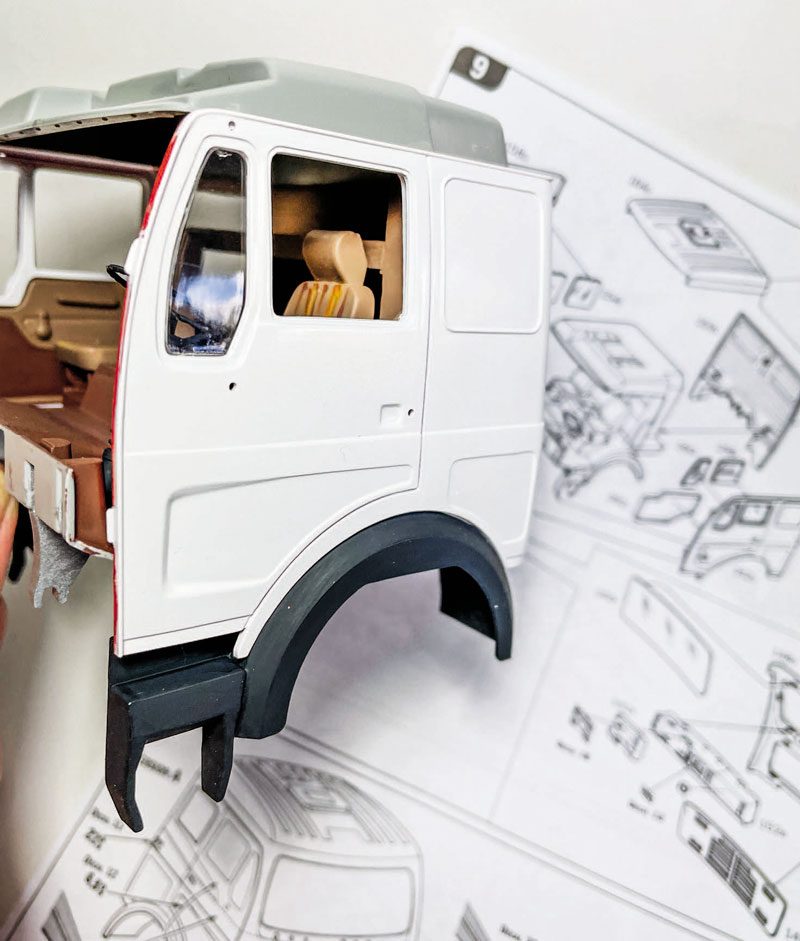
Picking up the Mercedes-Benz instruction sheet, we find ourselves at step 9, the assembly of the cab. Italeri provides its cabs in flatpack form, requiring assembly one panel at a time. This approach has its merits. But it requires attention to detail to ensure that all the pieces go together in the correct sequence, thus achieving a clean and tight finish.
Our first step with the cab build is to paint the individual cab panels a crisp 1990s shade of ‘Arkikweiss’, or ‘Arctic White’ if your German is a little rusty. One of the benefits of Italeri’s flatpack cab panels is that the painting process is simplified. By leaving all the panels on the sprue as manufactured, you can easily handle all of them at the same time without leaving fingerprints on the freshly painted parts. The other benefit is that it is easier to achieve an even and well-matched coat of paint across all the panel surfaces.


Before applying any paint, it is important to ensure that the surfaces are clean of any residue or dust. If necessary, gently wash the entire sprue (with all the parts attached) with a solution of warm soapy water. This will remove any grime or sticky fingerprints that might be hiding on the surfaces. Once clean, be sure to allow the parts to dry thoroughly as paint does not like water.
Italeri depicts the Mercedes-Benz on the box illustration in a nice shade of red, so when moulding the kitset, it has kindly used a red plastic to match. However, this is of no help to us as our cab needs to be white. To achieve a solid cover of white paint over the red plastic, we first need to apply a coat of white primer. The primer forms a solid base for the topcoat and stops the red plastic hinting through the details. Tamiya makes a good primer in white – ‘fine surface primer’. This product adheres well and dries fast. The trick with applying primer is to not lay it on too thick – a thin coat that has good coverage is all that is required. The more paint you apply, the less detail you will see, so easy does it on the trigger.
With the primer fully dry, we can now look at applying the topcoat, but just before we reach for the spray, use this opportunity to check again that the surfaces are clean of any dust particles or the like. Also, have a close look for any blemishes at this time that might have settled in the primer while it was wet. You can use an extra-fine sandpaper to gently remove these if needed – just be careful not to sand too vigorously and remove the fresh primer revealing the red plastic again.
Selecting the topcoat for this project, I found the closest match to ‘Arctic White’ was Tamiya TS-26 ‘Pure White’. Just before you begin spraying, as with all spray cans, shake the can as per the manufacturer’s instructions. This ensures that the paint is correctly agitated and blended, dramatically improving the spray formation and, in turn, the overall finish of the topcoat. Once more, less paint equals more detail, so again gently does it on the trigger. Short, well- directed passes that gently build up the topcoat is the way forward here, keeping a close eye on progress and ensuring that all nooks and crannies have been covered. A little hint at this time in the painting process is to flip the sprue over and apply paint to the interior side window and windscreen frames, as these will be seen once the build is completed. Allow the topcoat to thoroughly dry before attempting to handle the parts, as there is nothing worse than lasting fingerprints in the middle of your completed model.


The assembly of Step 9 in the instructions is again sequenced numerically to simplify this fiddly stage of the build. The real trick here is to follow the steps exactly as detailed and, most important of all, take your time. So much of this stage of construction will be forever seen, so attention to detail and a good dose of patience now will pay dividends when it comes to the final result.
Before the assembly of the cab proper takes place, you will see there are three sub-assemblies to complete. Starting with the left and right-side panels, the installation of the windows is first and then onto the interior door panels. When fitting the windows, standard plastic cement will work. However, it is recommended that a water-based glue is used as it is less aggressive and dries clear. An example of this is Revell’s Contacta Clear, a water-based adhesive that is supplied in a small 20g pottle with an easy application brush fitted to the underside of the lid.
The assembly of the front panel involves the fitting of the dashboard and the application of two decals, one for the instrument cluster and the other a radio. Decals require a delicate touch and not too much fussing about. The first step is to cut the required two decals from the sheet. Then, in a small bowl of warm water, submerge the decals one at a time for approximately one minute until the decal has let go of the backing paper. Remove the decal from the water while it is still sitting on the backing paper, place the backing paper alongside the decal’s resting location and, with a cotton bud, slide the decal off the backing paper and into place. There are products available like Tamiya Mark Fit that assist with the setting of the decals. It is applied while the decal is still wet, helping with positioning the decal as well as fixing it in place while it dries.
Once the three sub- assemblies are completed, the main cab construction can begin. The first step is to fit the rear panel of the cab to the back of the interior. This forms the backbone of the build, with the left and right- side panels next. Remember to gently clear the paint from the edges where the panels meet, so the glue can adhere correctly to the plastic. Take your time with this stage as you do not want to rush things and accidentally apply too much glue, ruining the paint finish.
Fitting the front panel is next, followed by the roof turret. This will take a little manipulation to obtain correct placement as well as gently holding the entire assembly together for a few minutes while the glue takes hold and sets.
With the cab complete, we can place it on the chassis and see the mighty Merc starting to take shape. Next month, we hit the home straight as we move on to fitting the cab accessories and the signwriting.


