
This month it is all about the painting and assembly of wheels and tyres in readiness for fitment to the axles.

Photo: Cut the sprue to isolate the four rims that need to be painted white. Leaving the parts on the sprue makes for faster and cleaner paint application.
It is now time to move towards a rolling chassis, so looking at step 4 and step 6, we see there are areas of sub assembly that detail the correct process for both the front and rear wheels. The first step is to paint the wheels and rims. The truck we are replicating is the Pilkington Automotive Glass Mercedes-Benz driven by Ken Kirk in the 1990s. This was an era where there were very few polished alloy wheels around. Today we live in an age where standard spec is highly polished alloy for just about every application, including rubbish trucks. Back in the 90s it was the polar opposite and it was all about 5- or 6-spoke artilleries or painted 10-stud steelies; polished alloys were special order only. Ten-stud steelies are what we find on our truck, painted with a two-tone effect, black wheel bodies to match the chassis, with very distinctive white paint applied to the outer faces of the rim edges. Italeri have moulded all the wheel bodies and rims on one sprue, labelled G. As you will see, sprue G is moulded in a silver plastic that will cover easily with both the black and white paint, so no need for primer undercoat here. First step is to leave all the wheels and rims on the sprue; this will make paint application a lot easier for us.
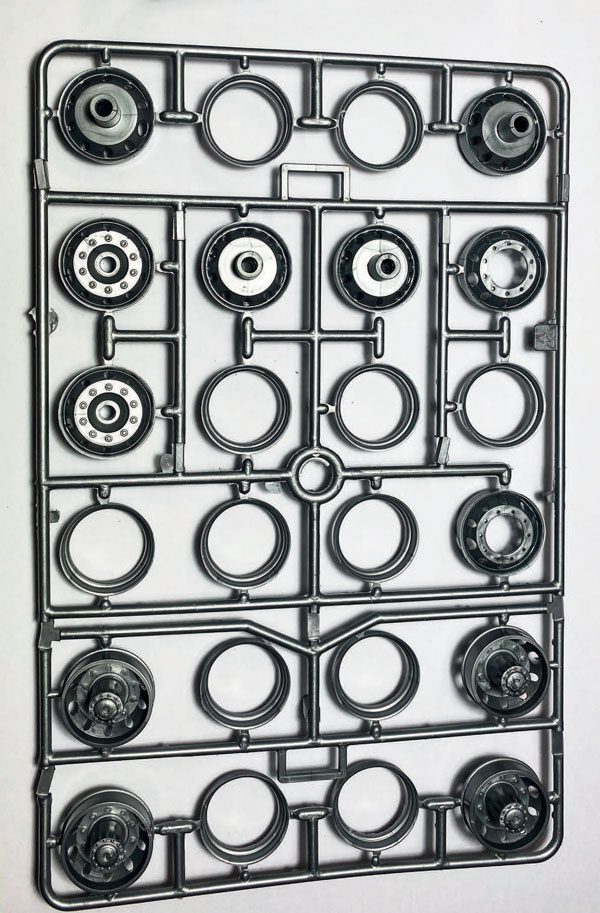
Photo: Cut the sprue to isolate the four rims that need to be painted white. Leaving the parts on the sprue makes for faster and cleaner paint application.
Next, identify an area of the sprue where there are four outer rims in close proximity to each other that you can cut away from the main sprue. This way you can paint these four together in the white on a mini sprue, then paint the balance of the main sprue in the black. This will greatly speed up the process for you and it is also easier to handle the freshly painted items while they dry. Have a quick look over the parts at this stage to remove any flash left over from moulding. Also, if necessary, clean any grease or grime that might be on the parts with warm slightly soapy water, rinse thoroughly and allow to completely dry. I have chosen TS-29 semi-gloss black and TS-26 pure white from Tamiya. These paints are supplied in 100ml mini spray cans that are premixed specifically for plastic model kit sets; they are set to go at a push on the nozzle.
Follow all the instructions and precautions on the can as you are dealing with a fine mist spray that is not good to inhale. When spraying with these mini cans you need to hold them about 250 to 300mm away from the item you are painting. Always keep the can moving so as to not load up the paint in one area. The art is to lightly dust the paint on from all angles to achieve a good solid coat that covers the plastic evenly but does not build up too thickly and hide detail. Once the paint has thoroughly dried remove all the wheel bodies and rims from the spurs and lay out in assembly sequence. Before applying glue, ensure that you use the sharp edge of your hobby knife to gently scrape away any paint on the areas that require glue application, as the paint will stop the glue from activating adhesion of the parts you are gluing together. Once all 10 wheels are assembled and glued together, allow them to dry completely.

Photo: Use a sharp hobby knife to remove paint from areas to be glued so the glue adheres correctly.

Photo: Use sandpaper to scuff the tread surface of the tyres to give them a realistic worn look.

Photo: Again, remove little areas of paint between the wheel nuts to get good glue adhesion.
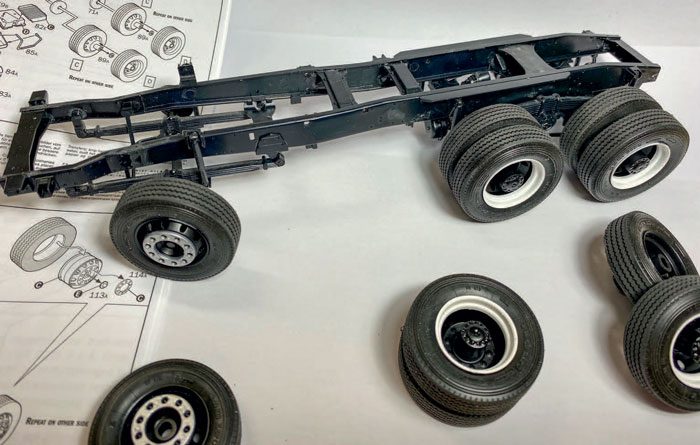
Photo: Another step closer, six wheels for our 6×4.
The early Italeri truck kitsets had rather crude tyres that were moulded in plastic and came in two halves that required gluing together. They were okay however, being plastic, they required painting with a flat black colour to give them a sense of realism. Fortunately the new Italeri kits now come with much more realistic one-piece tyres that are moulded from rubber, so factory fresh they have an extremely realistic finish and greater level of detail. Gently remove the tyres from the sprue by using either micro shear side cutters or a sharp hobby knife. One trick that I was taught is to gently sand the tread surface of the tyres before you fit them; this adds a true sense of realism by giving the tyres a genuine scuffed and slightly worn look to them. Once you are happy with the look of the tyres, fit them onto the completed wheel assemblies. The last items to fit are the decorative wheel nut covers to the two front wheels. These are both numbered 114A and are also moulded in silver. You can fit them as they are, or like I did, paint them with Tamiya X11 Chrome Silver to give them a bit more sparkle. Again, gently remove the paint in between the wheel nuts so that the glue will adhere directly to the plastic. There we have it, a completed set of six wheels for our 6×4 Mercedes-Benz. Next time we will be fitting all the various accessories to the chassis in preparation for painting.

Photo: Our subject matter, Pilkington Automotive Glass/Ken Kirk circa 1992.
![]()
![]()
![]()
![]()


